You’ve got the popcorn ready, the party invites have gone out, you have your outdoor projector plus screen, and a shortlist of great movies. In theory, you should be all set for your backyard movie night!
Or are you?
Planning a backyard movie night should be simple, but chances are there could be some things that you have forgotten about or even failed to consider.
This is the ultimate guide to planning an outdoor movie night and it’s already been a reference point for thousands of visitors to the Outdoor Movie Projectors website.
I regularly update it so once you’ve read it, please do bookmark it. Chances are it will have new additions to it by the time you plan your next backyard movie.
Tips on Planning an Outdoor Movie Night to Remember
Planning an outdoor movie night needn’t have to be set to military precision, but given the fact it’s hopefully going to be a night to remember, it makes sense that you take every care to ensure it goes off without a hitch.
Read on for my essential tips for setting-up and hosting your own backyard or outdoor movie night – take this all in, and you can get it right first time and at a great cost.
I outline each step and piece of equipment you will need, plus additional advice on the technical aspects to consider. We’re going to start with the projector itself.
01: The Outdoor Movie Projector
Without a projector, you aren’t having a party.
Yes, you can take your TV out into the backyard, but it doesn’t really have the same appeal as using an outdoor movie projector.
For the best experience possible, you will need to invest in an outdoor movie projector. Not any old one though, but one that will offer great visuals and a stunning atmosphere.
But this is sometimes the point at which people can be confused because when it comes to buying projectors there is so much technical jargon involved. This can make it really hard to know exactly what it is you have to buy, depending on who you speak to or what you read online.
Now whether you have a big budget and can spend thousands, or just want something cheap and portable for under $200, it still pays to know what all the different terminology means so you can get the best outdoor movie projector for your backyard movie night.
When shopping online you are going to see various words used, but what do they all mean?
I’ve put some explainers together, which will help you in deciding what type of projector you should be buying, and why.
Read on for a list of the technical jargon, but broken down into explanations that anyone can understand.
Aspect Ratio
You might already be familiar with this term, as it’s often used with in-home TVs and cameras. It’s not the most important aspect to be concerned about, but getting it right will offer some marginal improvement to how you view the movie in your backyard.
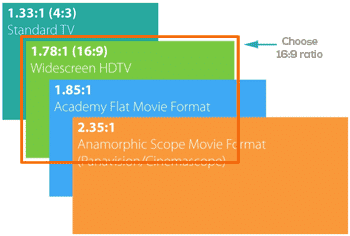 Aspect ratio for outdoor movies – choose 16:9
I always advise that you purchase an outdoor movie projector with an aspect ratio of 16:9. Most products that you see online to buy will already be at this ratio, but please do make sure to check before you purchase.
But why is aspect ratio important for outdoor movies, or any movies for that matter?
In the modern age, we are all very familiar with the concept of a widescreen movie. The latest releases are all formatted in widescreen, and that ratio is always set to 16:9.
What this means in practical terms is that if you have a 16:9 projector, it will show your backyard movie at the right aspect ratio without having gaps on either side of the screen, annoying masking, or light bleed.
Thankfully, the manufacturers of outdoor movie screens know this too, so any screen that you also buy will also need to be at this ratio. I am going to come onto screens later on in the planning guide though, so hold that thought for the moment.
If you don’t decide to buy a proper outdoor movie projector, but instead opt to use something like the type of projector you might find in an office or business, then you might experience a poorer quality viewing experience.
The reason being is because projectors used for business tend to output to different aspect ratios – and won’t show mainstream movies correctly.
Let’s be honest though, many people (aside from technology and movie buffs) may not even notice if you have aspect ratio problems. But it’s still important if you really make the best outdoor movie night possible.
Resolution
Don’t get too caught up with this.
We’re often sold on films being in HD, or the TVs that we buy having to be in the highest resolution possible when it comes to viewing quality. But it’s not as important when watching movies outside. I promise you.
The guests at your backyard movie party aren’t going to be scrutinizing the screen for pixelation problems. Not just that though; you’re showing a movie outdoors – the picture is never going to be perfect and I don’t think anyone would expect it to be either.
Think about it this way; HD images or high-resolution only really work when you are watching something in optimum conditions. That’s not going to happen outside. It’s something for a cinema-goer or home movie buff to worry about.
There are also other factors at work that can mean things might not be picture perfect – for example, the screen might have creases or there could be artificial lights bouncing off the screen, or you might be watching before it’s pitch black dark outside.
As I said, it will never be 100% picture-perfect.
If your budget allows for it, then by all means opt for high-definition (HD) and the highest resolution possible, but don’t obsess over it too much.
Lumen Rating
Ah… lumens.
These critters are the without doubt the things that confuse people the most about outdoor movie projectors. I’ve lost count of the number of times I have been asked what lumens are, and what they do.
In real simple terms, the lumen rating of your projector tells you how much light it can emit.
Projectors with higher lumen ratings will be able to project better quality images. They can reduce the effect of artificial light sources that could interfere with the projected movie.
For example, if you have a projector with a low lumen rating, then something like light coming from a house window could affect it.
Most outdoor projectors on the market that retail over $300 should have high enough ratings, but it’s still worth checking before you buy.
As a rough guide though, don’t buy anything with less than 2,000 lumens. That should mean you have a good quality image at night-time. But the image quality still might suffer at dusk when the sun is setting – always watch backyard movies at the complete dark of night unless you have a really expensive projector.
If you want to start watching movies at sunset, then go for something higher, and closer to the 3,000-lumen rating (or more) – those projectors will work well when it’s not pitch-black dark meaning you can start your movie night a lot earlier.
If you really want to get more in-depth, then go take a look at this article I wrote which explains what the best lumens are for outdoor projectors.
Honestly, though, don’t bother unless you are going full-professional mode with your backyard movie party or are in this for the long-term as a hobby.
Inputs & Adaptors
Most modern projectors will have the correct inputs and ports on them to let you pretty much plug in any device and start playing movies.
Backyard movies can be successfully played via smartphones, laptops, games consoles, hard disks, USB drives, over a Wi-Fi connection, and most obviously and as you would imagine, DVD players.
If you are buying a movie projector and you know what type of device you are going to be playing your movies from then make sure it has the correct inputs so you can connect the two.
Keystone & Lens Shift
Older projectors don’t come with this, but what does it mean?
Think of a scenario where your projector is on a table, and pointing at an angle up to the screen. This can produce image distortion.
What modern movie projectors have are keystone and lens shift buttons (or dials) which will let you adjust the projected image to the correct dimension, angle, and size.
Don’t buy anything that doesn’t have this option on it. That is unless you can guarantee that your movie projector is going to be completely level with your screen at which point it becomes less important.
Maximum Size & Throw Distance
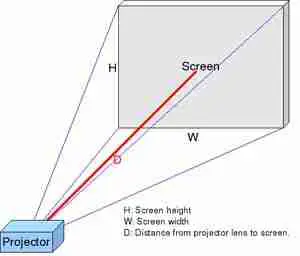 © Wikipedia
This is where some planning will be needed as it will depend on the size you want to project your movie at, plus the space you have available in the backyard (e.g. the throw distance from the screen to projector).
Let’s say you have a movie screen hanging in your backyard that is 180 inches wide. It stands to reason that you will want a projector that can project at that type of width so you get the best image possible.
In order to project a larger image, projectors will typically need to be set further back from the screen. If your projector needs to be set 25 feet back from the screen to get the 180 inches wide projection, you are going to need that room in your backyard to project over.
When looking at outdoor projectors, they will have a number in the specification which might look something like 1.5:1. This means you need your projector to be 1.5 feet away from the screen in order to project 1 foot of width.
Still not sure? Then what you need to do is re-calculate the throw width.
In a real-world example, if you have a projector with a throw ratio of 1.3:1 and your screen is 10-foot-wide, you would need to perform the calculation below to determine how far back you set the projector from the screen.
10 (width of screen) x 1.3 (throw ratio) = 13
This calculation tells you that your picture will be perfectly proportioned and lit up as long as the distance between screen and projector is 13 feet.
Does This Really Matter When Planning an Outdoor Movie Night?
Honestly, you can get going with a cheap projector, a cheap screen, and a movie. I’ve even put a guide together which tells you how you can do everything for less than $400.
If you are just starting out, or think it’s just going to be a small one-off event with a couple of friends and never to be repeated then much of the advice on technical jargon might be overkill.
But, I am guessing the reason you are on this website in the first place is that you are taking your planning seriously, right?
With that in mind, I’ve road-tested a couple of outdoor movie projectors that I would use if I wanted to put on a great party from scratch and don’t already have any existing equipment.
Both of these product recommendations are ones that I have installed for not just my own backyard parties, but also when I’ve consulted on setting up events for corporate clients and customers.
Recommended Projector Under $300

![]() Epson is a name you might recognize, as they are a leading brand when it comes to projectors. They have an entry-level model which comes with a massive 3,200 lumens, meaning you can watch before the sun even sets properly.
Epson is a name you might recognize, as they are a leading brand when it comes to projectors. They have an entry-level model which comes with a massive 3,200 lumens, meaning you can watch before the sun even sets properly.
That product is the Epson VS250 – see latest prices on Amazon.
It’s fully compatible with a range of playback devices due to the USB and HDMI ports on the back, projects a clear and bright picture, and has a long-lasting lamp slated to last for 15 years of use!
The best thing about it though is the ease at which it can be set up in your backyard. It is one of the simplest plug-and-play models on the market.
Recommended Projector Under $700
If you are planning on outdoor movies night becoming a regular feature in your life, or simply want something that is truly outstanding, then, of course, spending more money is going to get you an amazing outdoor projector that will last and will offer amazing visuals.
My higher-end recommendation is the Optoma HD28DSE – see latest prices on Amazon.
It’s an HD high-definition model with 1080p, as well as being 3D-ready. As you would expect, it’s compatible with multimedia and smart devices for playback.
The best thing about it though is the picture and image quality which is quite simply stunning. It’s razor-sharp, crisp, and gives you the most professional outdoor movie viewing you could imagine for under $700 dollars. Go check it out and read the online reviews.
Looking for a Cheaper Option?
If you want to explore cheaper options, then I encourage you to look at my recommended gear section. This details outdoor movie projectors for all budgets, including some that even retail at under $100.
You can read product reviews, compare projectors, and choose a product based on your budget in that section.
02: The Movie Player
Gone are the days when you would have to hook up a DVD player (or even VHS!) in order to get a movie playing in your backyard. Whilst that option is still viable, and most projectors will happily let you connect up a DVD player, there are no other options available as your chosen media player.
Nowadays we consume video content on a wide variety of different formats, but thankfully the technology with outdoor movie projectors has kept up with developments – meaning you should be able to plug in and play from virtually any device.
So, what will be your choice of movie player?
Ultimately it doesn’t really matter as long as you can connect it to the projector via USB, HDMI, VGA, or Wi-Fi and you get a decent picture.
Having said that, it can be much easier to play an outdoor movie from a smaller and more portable device, especially if it’s wireless and doesn’t require additional cabling to connect to the electricity outlet.
The types of devices you can play outdoor movies on in your backyard can include, but are not limited to:
- DVD player
- Blu-ray player
- Laptop
- Tablet
- Smartphone
- USB stick
- Portable hard-drive
- Apple TV
- Amazon Fire Stick
But one consideration here needs to be your audio.
Most modern projectors will come with built-in speakers, but they aren’t always that loud and might not carry the best audio quality.
In cases such as this, you might want to ensure that you can connect a sound system or speakers to your choice of media player, but I will talk about audio next.
03: The Sound & Audio System
How you arrange to set up the sound and audio at your backyard movie night could be the most complex aspect of the entire planning of the party.
As mentioned, most modern projectors that you buy will come with built-in speakers, but they tend to be of low wattage, and won’t give off a great listening experience.
It’s the same with the latest flat-screen TVs that are now popular. Because they are flat-screen, the built-in speakers don’t offer as much “beef” as the ones you used to get in old-fashioned TVs – which is why soundbars are such a recent trend in the home entertainment market.
The issue is exactly the same with the built-in speakers that come with portable outdoor movie projectors.
If the sound is poor or your guests can’t make out what is being said in the movie clearly then it’s going to add up to a disappointing backyard movie experience.
That’s why I always bring sound to the party as well.
But let’s not over-complicate things.
The best approach to any outdoor movie night planning is to limit the amount of wiring and cabling you need to do – which is why I always opt for Bluetooth speakers.
Yes, you can connect up cabled speakers to your system, but if you can do away with additional cables, then it’s much better and makes the whole set-up easier to manage.
The Bluetooth speaker set-up I currently use is from a manufacturer called AOMAIS. They offer a very robust, waterproof, and booming bass high watt outdoor wireless speaker that is ideal for this purpose – see the latest prices on Amazon.
It uses wireless stereo pairing to connect up to your movie player device, and currently has over 1,000 positive reviews, being one of the top-rated Bluetooth speaker systems on the market.
It’s easy to see why too, as it won’t ruin in the wet (it’s been tested 33 feet deep for 30 minutes!) connects to devices wirelessly, and a charge will last for 30 hours making it truly portable.
04: The Outdoor Movie Screen
I guess you were wondering when I would get to this point as this is the final part of the technology puzzle when planning your backyard movie party.
The reason that I left it to last is that it’s an area where you can either spend the time building your own outdoor movie screen on the cheap or buy something that is purpose-built.
The purpose-built movie screens are still cheap enough though and can get you up and running a lot quicker, so I guess it depends on your DIY skills, budget, or how quickly you want to get everything set up and ready.
In the past, I have built my own screens. I’ve tried all the different materials and methods you might have heard of including bedsheets, painted walls, plus screens and stands I made in my garage.
I am going to go through all of the options available to you, listing out the pros and cons of each method. If interested, you can also click here for more information on the best material to use for you an outdoor movie screen that goes into more detail.
Using a Bedsheet as an Outdoor Movie Screen
For the cheapest possible approach to showing your backyard movie, you could use a bedsheet.
Do I advise it though?
No, absolutely not unless you have no other options available to you, and here’s why:
Pros
- It’s free assuming you have a spare one available
- It’s easy as you will just need to hang it up
- It’s quick as you won’t have to buy special materials or equipment
Cons
- It’s thin so the projected image will be of poor quality
- It will be wrinkled and creased, again leading to poor image quality
- It could move or blow in the wind
If you do decide to use a bedsheet then it could be more trouble than it’s actually worth.
Bedsheets are also very thin, so when you beam strong lights onto it from your movie projector, it’s likely that you will pick up anything behind the bedsheet too, not just the movie – it won’t look good.
You could set up a black sheet behind it, or double-fold the bedsheet up, but even so, you will still have viewing problems as the wind and wrinkles become your worst enemy.
It is possible to tether and secure the bedsheet and make it as tense as possible, but honestly, I would invest in something more built-for-purpose, which I will go into shortly.
Paint a Fence or Wall as an Outdoor Movie Projector Screen
Something more permanent, and still almost at no cost, is the painting approach. All you need is some paint, a brush, a wall, or a fence. But don’t use white paint, I will tell you why in a moment.
Pros
- It’s cheap to do as all you will need is some paint and brushes
- It’s relatively quick too and won’t take too long
Cons
- It won’t offer a great image quality due to marks on the wall or fence
- It’s very permanent (do you really want a painted fence or wall?)
- It might not let you project your movie at the optimum height
If you do decide to use this method, then don’t paint the wall white. A more gray color will give you a better picture – gray absorbs light from the projector better than white does.
You won’t get a great result though, no matter how hard you try.
It’s not just about the impracticality of the method, but also you might not have the highest of the wall to use. Low walls and fences will mean you cannot project to a high enough level that’s comfortable for your guests at which to view the movie.
There will also be the issue of the wall or fence not being completely flat – they are almost bound to have marks and undulations on which will warp the movie image.
Make Your Own DIY Outdoor Movie Screen
Are you good at DIY? Are you very handy with tools and creating things? Do you have time on your side when planning your outdoor movie night?
If you answer “yes” to all of those questions then you might want to consider building or making your own backyard movie screen.
It’s a simple project, but in reality, it’s easy to get wrong, plus will take time and materials. Do have time to potentially waste? Maybe that answer is now “no”.
I won’t include all of the instructions here, or the pros and cons of doing this. The reason being is that I’ve already put together a comprehensive guide and plan on building your own outdoor movie screen – this goes into loads of detail so read that for more information.
Buy a Portable Outdoor Projector Screen
There are two options available to you when you buy a screen package. Both options let you set up the screen using the kit in the comfort of your own backyard. They are either inflatable ones or fixed-frame models. My preference is for fixed frame screen kits, but both are viable options.
As before, I will explain the pros and cons to both, and give you some product recommendations for you to consider when planning your outdoor movie night.
Inflatable Outdoor Movie Screen Method
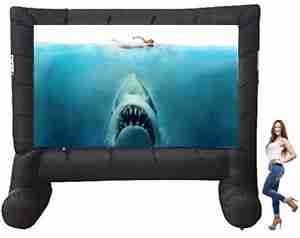
The great thing about an inflatable movie screen is that you can buy models which are very, very big, offering a large screen experience that’s unrivaled in most backyard movie parties.
Pros
- They are very cheap
- You can buy very large inflatable screens
- They are quick to set-up
- They are light so you can move them around
Cons
- They are bulky and large when it comes to storing them
- You will need to keep the electric blower running to keep them inflated
- You will need power and cabling for the blower
- The air blower can be noisy due to the constant fan sound
Being relatively cheap means they offer a great option for those shopping on a budget. But for me, the additional complexity of having to power the air motor blower constantly when the inflatable movie screen is up is a pain.
They work very similar to how those bouncy castles do that you see at kid’s parties. If you’ve ever stood near to a bouncy castle you will know how noisy the fan blowing air into them can be, and that will need to be running constantly too.
They will also take up a lot of storage room, as despite being lightweight when the air comes out and they collapse down to be put away, it’s a very large item.
Still interested in getting one?
Then the recommended inflatable movie screen from me would be one of the EasyGo screens. You can buy in various different dimensions, some of which I have listed below for sale on Amazon.com – expect to pay at least $145 dollars for the smallest one.
- 8 Foot Wide Screen – view on Amazon
- 12 Foot Wide Screen – view on Amazon
- 12 Foot Wide Screen – sturdier model – view on Amazon
Fixed-Frame Portable Outdoor Movie Screen Method
My preferred option would be a fixed-frame outdoor movie screen DIY kit. There are many different products on the market. I have my preferred brand which I will talk about after the pros and cons of using these fixed-frame kit screens.
Pros
- The kits are quick and easy to assemble
- They are easy to store away and collapsible into separate parts
- They are simple to transport due to portability
- The kits are cheap and affordable
- They come with purpose-built screen material for projection
- They are sturdy and attach to the ground securely
- They are quiet and don’t make any noise
Cons
- If someone falls into them at the party, they can damage and break
- You need to secure it firmly and taut to the ground
- They can either hang up or be set on tethered feet
- They take a little longer to erect than inflatables do
- They tend to not be available in as large a size as inflatable screens
My preferred manufacturer for fixed-frame portable movie screens would be the Carl’s Place product range. They have been in the business for many years, and have brought out new models based on customer feedback every couple of years.
Carl’s Place offers different-sized versions that either come with feet so you can set them on the ground, or you can go cheaper and just buy the frame and screen so that it hangs from a fence, pergola, or wall.
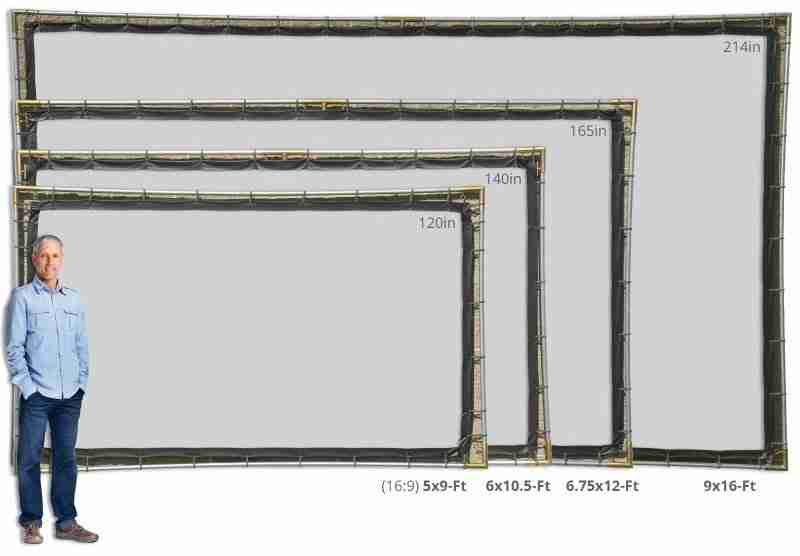
Expect to pay anything between $140 all the way up to nearly $700 depending on which kit and size you decide to buy. I recently reviewed the Carl’s Standing Screen kit (read the review here).
There is a wide range available on Amazon.com, so all I am going to do is give you direct links into a cheap and small kit version with feet, and a cheaper hanging model. Browse around once on Amazon to choose the best size and set-up to suit your backyard movie night needs.
- Cheap DIY Kit with Feet and Stand – view on Amazon
- Cheap DIY Kit Hanging Screen Only – view on Amazon
Final Thoughts & Conclusion
So, there you have it, I hope this has given you a great guide on how to plan an outdoor movie party so you put on an amazing night that will live on in the memory for years to come.
If you do value the time it’s taken for me to put this guide together, then I would appreciate that you share it socially, and give me any feedback you might have.
There are some final thoughts though which I want you to consider, and those relate to common questions I often get.
The most common question relates to whether it’s illegal to show a movie in your backyard.
The quick and simple answer is “no”, but there will be some consideration you will need to take. I’ve written about those separately so click here to read more about the legal implications for backyard movies.
Other things to think about are your neighbors.
You’re lucky if you don’t have any, but most people do.
My advice is to always invite them over to your event. I find that this will significantly reduce the chances of any complaints. As a rule of thumb though these are the things you want to make sure that doesn’t do:
- Don’t show any movies with objectionable scenes that they or their kids can see
- Don’t let your guests be rowdy and noisy disturbing neighbors sleep
So that’s the worrying aspect out the way.
Other things to think about when putting on a movie in your backyard are listed below. Consider these items, plan them carefully, and you should have an amazing movie night.
- Seating arrangements
- Food, snacks, and drink
- Invites
- Safety
- Lighting
Finally, Good luck!
(Please share any photos or feedback after your party, I would love to know how you get on!)


