
For an affordable and simple outdoor movie screen set-up, you can’t go too wrong with Carl’s standing projector screen kit. It’s my recommended product for people on a budget and is a screen I have used time and time again for my own backyard movie nights. You can either set it up on a stand and base or hang it up depending on your preference.
There are 6 different sizes available on the market, all of which have the same functionality, and an almost identical assembly process. To read my review please scroll down, including all the pros, cons, negatives, and positives to using this outdoor movie screen.
What’s Included
- Flexiwhite screen with black vinyl edges
- Bungees for securing to the ground
- Steel corner and support fittings
- Assembly instructions
Want to Buy? If you are interested in buying it, or just want to check the latest prices then you can look now on Amazon. Currently it ranks 4.5 stars out of 5 in terms of online reviews making it one of the most popular available. Click here to view the best deals on Amazon.com.
Choose Your Size and Aspect Ratio
When you come to buy, you will notice that some of the models are listed as 16:9 aspect ratio, and some at a 4:3 aspect ratio. For outdoor movies and watching sport always opt for a 16:9 ratio as this is the widescreen format that modern TV and films are shot at. It’s more than likely too that your chosen projector will project at the 16:9 aspect ratio, meaning you can fill the entire screen whilst watching movies – therefore getting the best results for your money.
How My Carl’s Projector Screen Review Will Work
In my review of Carl’s DIY projector screen kit, I am going to take you through the set-up process, explain the pros (and cons), listing any positives and negatives in order to give you the best idea on whether or not this is going to be the right product for you.
It’s a completely honest and open assessment.
There are alternatives on the market, some cheaper, some more expensive, but for me, if you are shopping on a budget and want something that’s relatively cheap and of high quality, you can’t go too wrong with this product.
The only real downside would be the situation where you don’t get the poles included if you want to make your screen stand up, but I will come onto that later in the review. But firstly, let’s go through the setup process.
Setting-Up the Carl’s Standing Projector Screen Kit
There are 6 different sizes available to buy. The one I used for this review, was the 6.75×12 foot model, at the 16:9 aspect ratio.
The sizes available currently are:
- 9×21 foot (272 inches wide)
- 75×9 foot (131 inches wide)
- 9×12 foot (175 inches wide)
- 5×9 foot (120 inches wide)
- 9×16 foot (214 inches wide)
It arrived boxed-up, with the screen materials folded. This was my first concern, as there were creases in the screen material. At the end of the assembly, creasing fears were unfounded though, as once the frame was assembled I was able to pull the material tight using the bungees so that the creases disappeared.
Back to the assembly though, I took everything out of the box, unrolled the material, and laid out the instructions.
Now as I have said, these kits don’t come with the poles to make the stand and frame. You need to buy these separately. In the instructions, it details the exact lengths of EMT pole you need to purchase so I took a quick trip to my local hardware store, got them to cut to size, and brought them back home – the total additional cost was just over $60. For the smaller kits, this pole cost will be significantly lower.
Handy Hint: If you don’t get your hardware store to cut the pipes, then use a pipe-cutter. You can buy them for around $20, with some decent ones found on Amazon – check here for Amazon pipe-cutters. Don’t use a hacksaw, it will take too long and lead to rough edges.
Once I had my poles cut to size, I spent 30 minutes slotting them into the connectors and fittings as per the instructions. You can see how clearly this is all labeled in the screenshot from the online manual shown below.
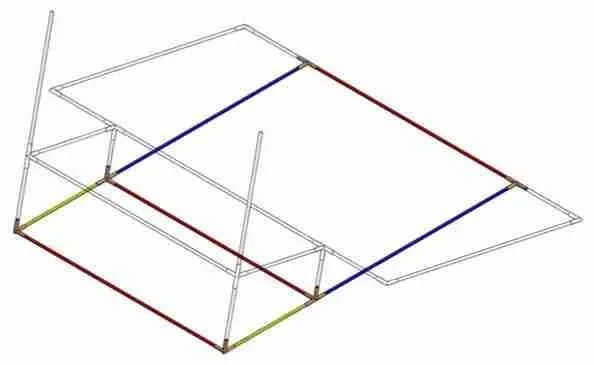 The instructions give clear guidance on how the poles need to slot together
If it wasn’t for these color-coded instructions, I might have struggled a little, but at no point did I need to refer to their video tutorials as the instructions are ridiculously easy to follow.
Handy Hint: Add color-coded labels to the poles so that you can quickly put the screen together next time you set it up in your backyard or outside. It will save you a lot of time in the future.
Once the frame and stand were set up, I placed the screen material into the inner frame and attached it using the supplied bungee cords. At this point, I had to enlist some help, as the trick here is to pull it nicely taught and tight whilst making sure that any small gaps are equal around the entire screen in the frame.
By pulling the screen tight inside of the frame, those folds I saw when first un-boxing Carl’s DIY screen, completely disappeared. All wrinkles were gone!
My helper and I then stood the screen up and position it into place in my backyard. I was now ready to tether it to the ground, but before doing that I wanted to test out the image and distance I was going to have my projector set up from.
I had to wait until dark to test this out properly, as you get the best image outdoors when projecting at night. With a little adjustment with our projector’s zoom and focus, we managed to fill the entire 16:9 screen with a beautifully crisp and clear image.
We were now able to tether the entire screen and stand to the ground using cord and tent peg stakes. Don’t forget to do this part! But you will need to use your own cord and tent pegs or stakes as they are not supplied – this is just my own recommendation as you really should anchor the screen to the ground for peace of mind.
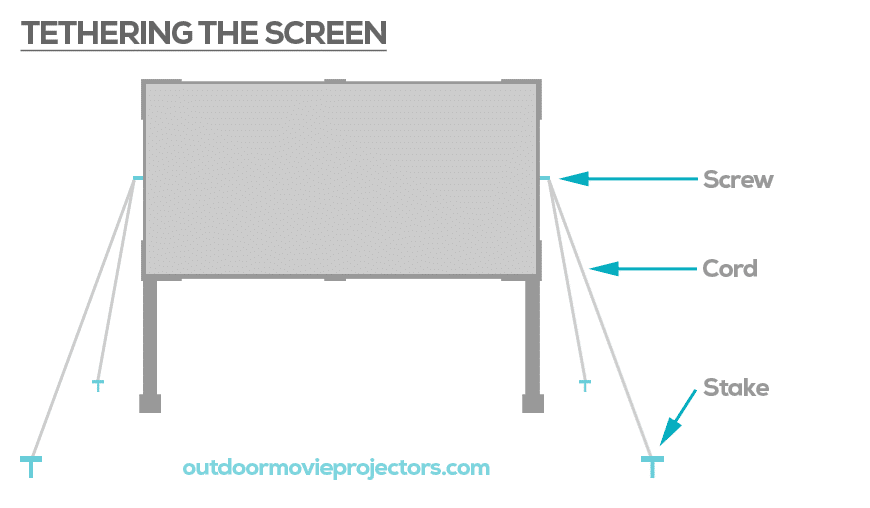 Make sure you secure your screen to the floor if you are worried about wind
Other than that, it felt very sturdy, with the total set-up time being around 45 minutes due to the learning curve involved. Subsequent set-ups have since taken me around 15 minutes as I have got more familiar with the DIY screen and frame.
Is the Stand Assembly Putting You Off? Try This Instead…

![]() I can completely understand if this assembly task is something that you don’t want to do. As an alternative, just hang it. In truth, hanging a screen is a more secure solution anyway.
I can completely understand if this assembly task is something that you don’t want to do. As an alternative, just hang it. In truth, hanging a screen is a more secure solution anyway.
If you are going to simply hang it, then you can buy Carl’s screen kit this doesn’t come with all the connection brackets, and simply comes in a format for hanging. It will be cheaper for a start.
This is what I would recommend if you don’t want to buy poles and go through this DIY process. You can still get the benefit of a great screen, but with a significant reduction in how long it takes to assemble.
Buy Carl’s Hanging DIY kit instead. It doesn’t cost as much and won’t require as much fiddling around, although you will still need to purchase poles to create the frame. You can see this product on Amazon too if that’s of interest to you.
Watching Movies on the Carl’s Projector Screen
So now for the most important part; actually watching something!
The picture quality is excellent, but as with any screen will also depend on how good an outdoor projector you have. See my own recommendations on this page.
The first thing I tested out was some live sport. I had a crisp and clear image, and no wrinkles in the screen at all due to the tightening of the bungees during installation.
The next thing I tried was a 3D movie, as sometimes these can look a bit odd on the cheaper screen material. It passed again with flying colors (quite literally). This is helped by the material being made from a premium bright matte white surface, with a 1.1 gain.
Would I Recommend it for Everyone?
Probably not. Whilst it is the best DIY outdoor screen kit on the market at this price, in my opinion, it doesn’t come without its complications, which are all relating to the pole assembly.
The lack of poles means you will need to buy and cut your own to size, which suddenly transforms this from a simple plug-and-play piece of kit into something that requires a little more effort.
If you are not that handy with DIY and don’t have anyone to help you, then you might want to avoid it and opt for a simpler product such as this inflatable movie screen on Amazon. An inflatable movie screen is completely plug-and-play but will mean you need an electricity supply to keep the air inflated constantly.
But, if you want something that’s built to last, provides stunning image quality, that you can leave standing outdoors overnight, and won’t get blown all over the place like an inflatable will, then this is for you. It also takes up less room than an inflatable and can be hung up if you don’t want to erect the stand for it.
Pros
- Great screen for the price
- Relatively easy to assemble
- Provides a crisp and clear image
- Can be hung or stood up
- Robust and wipe clean material
- Different sizes available
- Simple to transport and store
- Sturdy base despite using poles
- Can be left up outdoors
Cons
- Stand poles are not included
- Needs a little DIY knowledge
- Does not come with a carry case
- Doesn’t support rear projection
- No cords or tent pegs for tethering (which I recommend)
Carl’s Projector Screen Review
Frequently Asked Questions (FAQs)
Can You Leave the Screen Out in the Rain or Sun?
The Carl’s Place projector screen kit is made from PVC and vinyl and has even been treated with a mildew-resistant coating. That means it is relatively weather-resistant and it’s fine to leave it set up over a few days in the summer.
I appreciate that you don’t always have the time to collapse down and pack away your screen at the end of the movie night, but I would still recommend doing so. I want to take the very best care of my equipment, especially when it runs into the hundreds of dollars as an investment.
At the very least, I would always detach the actual screen element and just leave the frame out. This only takes a few minutes, but that’s about as lazy I would recommend you get it.
When you take the screen element down, if it’s been left out overnight then it could have dampness on it. Always wipe this and dry it clean before you store it away as if you don’t then there’s every chance that mildew or mold could develop.
If you do decide to leave it out, then you might experience a bird mess being left on it. The polymer surface means you can wipe it clean easily, or even hose it down.
One aspect I have not tested, but I imagine could be an issue would be the cords that I recommend you use to tether the frame and screen to the ground. They probably aren’t going to be as weather-resistant as the actual PVC and vinyl, and chances they could fray and become damaged if exposed to sun and wet rainy weather.
Another thing to consider is the wind. If you leave your Carl’s projector screen up, you don’t know how a gust of strong wind could affect it. Whilst it’s tethered and secured to the ground, very strong winds could damage it, so another reason there to take it down after use.
So short-term if you are a little lazy then yes, you can leave it out in the wet and sun, but on a longer-term basis, I would definitely pack it away for your next outdoor movie night. My advice is to always store it away after every use though. But that’s just me!
Does it Sway or Bend in the Wind?
If it’s a windy day, then yes you will get some swaying, no matter how well you tether and secure it to the ground. But on most summer nights, there should be no problem. The key here is to watch the weather forecast leading up to the day of your backyard movie night.
From my own personal experience, winds stronger than 25 miles per hour can present an issue. My advice would be to try and place it in a spot that is protected from prevailing winds and during assembly pull the screen as tight as possible inside the frame.
I do know some friends who live on the top of a hill where the wind is a particular problem. They leave their screen out for the summer but use sandbags on top of the stand to keep the screen more secure. This works well for them.
If you follow my advice though and always take it down after use, then I can’t see you need to take drastic measures such as this though.
How Should I Clean and Maintain it?
Screen maintenance is something that I take very seriously, and Carl’s product is very easy to clean and keep in a good condition.
To clean it, you can follow this process that I use, which seems to work very well and keeps the screen in an optimum condition:
- Get a bucket of warm water
- Add a small amount of mild washing-up liquid
- Lay the screen flat on the ground
- Lightly rub the screen with a sponge or soft rag
- Finally, hose it down
I would also recommend that you test clean a small surface area first to make sure you don’t damage the screen. Never use an abrasive cleaning material, don’t steam clean it, and definitely don’t put it in your washing machine.
If the stains are really stubborn, then I would consider testing a small amount of mineral spirit or an alcohol-based cleaning agent, but this would be a last resort only.
Once clean, make sure it’s completely dry, and then store it in a dry environment with no damp present.
Can it be Used for Rear Projection?
Unfortunately, not. But that shouldn’t be a deal-breaker for most people who want to watch movies in their backyard.
The Carl’s Standing Projector Screen kit I am reviewing here is the Flexiwhite model non-translucent screen with a solid thick black material on the back of it. This Flexiwhite screen is only sold to be used with front projection only.
Carl’s Place does sell outdoor projector screen kits that allow for rear projection, but not on this kit. One of the better ones would be the 5×9 foot rear projection standing kit (view on Amazon).
Is it Good Value for Money Compared to Other Kits?
The Carl’s screen kit does require some assembly, but don’t let that put you off as it still offers exceptional value for money compared to competitive products in the marketplace.
This company is renowned for the quality of the product, as well as the customer feedback. You only have to look at the reviews on Amazon to see how well this product stacks up and compares against other similar free-standing screens of a similar size.
From a design perspective, Carl’s outdoor movie screens are all hand-sewn and are built from very sturdy and robust components, offer a great visual experience, and are simple to assemble aside from the time it will take you.
Which Size Should I Buy?
How much room do you have is the question you should really be asking? I always recommend that you buy as large a size as you possibly can fit into the available space that you have.
However, the image size you are going to be able to project will depend on your actual projector itself, including the available throw distance.
If you are unsure about the best projector to use with Carl’s standing projector screen kit, then go take a look at my recommended products to go with this screen.
How Long Does It Take to Assemble and Take Down?
The first time that you put yours up you realistically could be looking at 45 minutes. It comes with comprehensive and easy-to-understand instructions in a diagrammatic format, with stepped procedures for assembly.
Whilst 45 minutes might sound like a long-time, it’s certainly worth it due to how good the screen is, as you can see from my review.
Once you’ve done it once, the next time you assemble it then you should be able to cut the set-up time in half to around 15 minutes.
Bear in mind, you will need two people (especially with the 16×9 model), as it’s quite hard to do with just one person due to the pole and screen tightening process.
What Height Will My Projector Need to Be?
When planning your outdoor movie night, one thing that will probably occur to you is how high your projector table needs to be when pointing at Carl’s screen. Don’t worry about this, it’s not at all relevant.
Why? Because all modern outdoor movie projectors have Keystone correction meaning you can project up or down towards the screen and simply make adjustments with the projector controls to ensure that the image is rectangular or squared off at the correct resolution and aspect ratio.
Do I Need to Buy Anything Else?
To get the screen standing up, yes you will, because the stand poles are not included, and yo you will need to buy these separately if you want the screen to stand rather than hang.
This is my only real gripe with Carl’s projector screen kit, and it seems like quite an oversight. I am sure they will sell more if they also included the poles, but for a reason only known to them, they don’t do so. I can only assume they don’t provide them because it’s up to the user as to how high they want the screen to stand also the implications for shipping through the post.
What you will need to do is buy 1-inch EMT poles. You can do so on Amazon or in your local hardware store – in some cases, they will cut them down to your required lengths.
Thankfully, Carl’s offers great video tutorials and instructions showing you what you need to do, and exactly how long the cut poles need to be.
Once you have the screen set up in your backyard, you will also need items including a projector, a media playing device (could be a laptop, smartphone, tablet, DVD player, or USB drive), and also some additional speakers to give the best sound quality. For some products, recommendations click here.
People new to the hobby of outdoor movies do occasionally ask whether they will need a projector, as strange as that sounds.
Yes, you do. Without a projector, you cannot view any movies or sports on the Carl’s Screen.
One last thing. I would recommend that you secure it to the ground. I use cords and tent pegs to do this. If you aren’t experiencing any wind, it should be fine as the base is sturdy, but it’s just an extra precaution that I would take. These won’t be included when you buy, but are worth picking cheaply just for peace of mind.
What’s the Best Projector to Use with the Carl’s Screen?
Carl’s screens are compatible with any outdoor projector. However, I do have plenty of recommendations designed to suit all budgets.
Head on over to my recommended projectors page, where you can see the best projectors for running backyard movies. All of the products have been tested by me, will work with Carl’s standing projector kits, and are listed in various price and feature categories to help you choose the best projector for your outdoor movie party or night.
Are There Any Alternative Screens I Should Consider?
 Carl’s are my recommended standing screen, I don’t use any other products, only this one. It’s a superb kit, that is un-rivaled on the market at the moment for those shopping on a budget.
Having said that, you might instead want to consider an inflatable screen instead. Inflatable screens are great fun and really quick to assemble as all you really need to do is plug in the blower fan and let it inflate.
If that sounds like something that you would like to know more about, then take a look at my review of the EasyGoProducts inflatable screen which you could consider instead.
Does it Work Well for Watching Sports?
Very well. I am a massive soccer fan and set this up in the evenings to watch streamed games from the UK Premier League. Providing you have a decent projector, this screen offers a crisp and clear image allowing for a great sports experience.
No matter what you want to watch, as long as you view in optimum conditions after dark and have a good enough projector with a high lumens rating, you are going to get great results.
Can the Screen Be Used Indoors?
Yes, it can, it’s not just for outdoor use. This website deals with backyard and outdoor movies, so my review reflects that with the comments and questions I am answering, but it can be used equally well in an indoor environment.
I have seen videos and photos online of people using this portable screen in halls, schools, gyms, and in a room indoors at home. As long as you have the space to stand it up, you’re good to go.
Can I Hang the Screen Instead of Setting-Up a Stand?
Yes, you can also hang it. There are grommets and holes on the outer part of the screen frame meaning you can hang up with cord or use hooks.
The hanging method can be more secure, and Carl’s screen can be attached to a wall, fence, pergola, or any solid structure providing that you attach it securely.
But if you are going to be hanging it, you don’t need to buy this particular standing kit, instead, just buy a hanging version that won’t come with as many connectors. It will be cheaper too – you can view Carl’s Hanging Kit on Amazon.
Should I Secure or Anchor it to the Ground?
Yes, yes, and yes again, especially if you are going to be leaving it up in your backyard. As mentioned, it doesn’t come with any cords or stakes so you will need to supply those yourself. Alternatively, you can use sandbags if you are really concerned about the wind, or even some fitness training weights instead.
Is it Easy to Store and Transport?
It doesn’t come with a bag but is lightweight and easy to transport.
The different sizes range in weight from 34 to 64 pounds, so it should be relatively simple to transport, but I would recommend that you store and transport it all in a box. I use a clear plastic storage box that I picked up from Walmart to transport and store mine.
In terms of storage, it depends on which size you buy. My only advice here would be to ensure that you store it in a dry and clean room so that it doesn’t get damp or damaged.
Review Conclusion
For something really quick and easy you might instead want to choose an inflatable screen. For something that is more robust and can be left outdoors over short periods in the summer, go for Carl’s standing projector screen. It will provide a better movie viewing experience.
Still not sure? Check out all of the amazing Carl’s Project Screen Kit reviews on Amazon.
Of all the low-budget and cheap outdoor movie screens, this is the best on the market. It suits you if you are going to be planning a lot of outdoor movies across summer and want something that is robust and can be stood in place securely – providing you secure it properly of course.
All that holds it back is the assembly requiring poles that are not shipped with this product. Other than that, it’s an excellent product.
The decision is yours, and I hope that this review has helped you in making your mind up.


